Monday, May 21, 2012

Baby Birds and Bumble Bees


The old cherry tree has been home to
scores of baby Starlings over the past years.
These siblings (the fourth is hiding down in the nest)
fledged the day after their photo shoot!
The parents are now cleaning house and
refreshing the nest for a second go round!


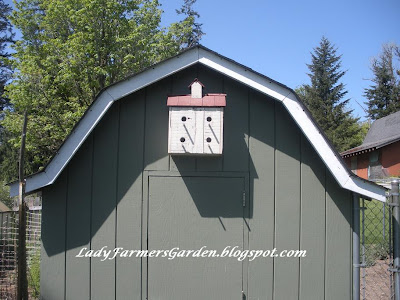
The bird condo has 'No Vacancy' as
all four apartments have been occupied. It only
took two days to be discovered since it made
it's appearance on the Hen Haus.
Look carefully at the entrance on the bottom
left ~ the happy bride is arranging
her new digs, while her groom
watches expectantly from the perch above!


We found a small colony of Bombus sitkensis,
one of 47 species of Bumble bees found
in North America. They made their nest in the folds
of the cat blanket that lay on the porch bench.
They commonly make their nest in a hole in the ground,
but on occasion, find other unique places that suit their fancy!
Our cat, Harley, unbeknownst to him, lay on his favorite
scouting post and squished one of the baby larvae
right out of the cell. You can see it just above the
top left bee.
I will attempt to move the bees and their nest
tonight to more safe quarters
and wash Harley's bed!

Did you know that you can raise Bumble Bees and
harvest their honey?
I have read that you can, but the honey is inferior
to Honey Bee honey ~ it is more watery
and ferments quickly.


Joining ~
Homestead Revivals
Barn Hop

My Simple Country Living's
Country Garden Showcase

An Oregon Cottage's
Tuesday Garden Party

Etsy Cottage Style's
Cottage Garden Party

A Delightsome Life's
Home & Garden Thursday

Mrs. Olson's
Share Your Cup Thursday

Deborah Jean's
Farmgirl Friday

Tuesday, May 15, 2012

A Garden Home for My Feathered Friends

It started out as a gifted bit of 'farmhouse' decor.
I didn't have any room for it in my home,
but there is much room out of doors!
And my little birdie friends will make
great use of it ~ at least I hope so!


~A gifted 'barn' display shelf~


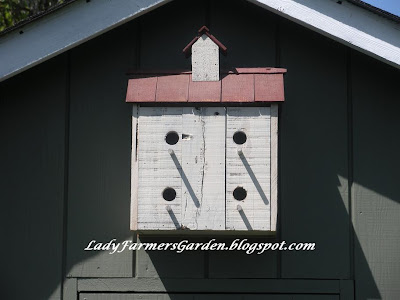
Gentleman Farmer used a hole saw
to cut out the 4 little doorways~


I drilled out the holes and pounded in the
dowel pegs for the little perches.
A little white paint to cover the raw wood
and perches ~ to match the white 'siding'!


Gentleman Farmer also fixed the back so it
could hang and easily be removed by just lifting it
 off for cleaning and winter storage.


4 family bird condo
hanging on the Happy Hens' Haus which
boarders the Spring Garden. It is a handy place for
both the birds and I as they can hunt for
insects in my garden and I  can
enjoy fairly pest free veggies and
birdsong while they flit and flutter
about filling the air with their
sweet melody!


Joining these fun blog hops:


Thursday, May 10, 2012

Sundry Contrivances (Miscellaneous Projects!)


So many projects on my 'to do' list!
A  few of them did get crossed off today, though. 
Like re-seeding a small patch of lawn
that my darling hens ruined!
It was lovely green sod as recent
as two years ago ~ a birthday present
to myself.
The hens and a couple of rogue roosters
scratched out all the grass and 'replanted'
it with weeds and other free seeding plants
that don't belong in the grassy area!
SO...
I mixed up a combination of organic compost,
mushroom compost and a garden mix of soils
and wheel borrowed it to cover the area,
after a couple of hours of pulling out as
much of the weed seedlings as I could. I
then raked it smooth and tamped it down level
and covered it with a nice layer of 1 Step Grass Seed.
(This was all done while the flock remained
on lock-down in their pen!)
#1 Done!
~
Then I had to rig up a temporary fence to keep
the rascals out of that little yard while the
motley crew were out free ranging!
#2 Done!

Grow quickly, little grass seeds!
~


As I was working on the temporary fence,
a visiting Black Headed Grosbeak
reminded me that I needed to clean
the birdbath and refill it with fresh water.
#3 Done!


~
Then I had to put up another little fence around
the Big Leaf Maple tree with a dry shade
planting around it. (Again, because of those
naughty hens!)
#4 Done!
~
Oh, now I need to get the weed whacker from the barn
and trim the grass away from the brick
surrounding the tree bed!
#5 Done!
~
Then, off to move the sprinkler and
water the Spring garden
planted with Carrots and Lettuces,
Cabbages and Broccoli,
Beets and Swiss Chard,
Peas and Spinach.
All are growing daily!
#6 Done!
~


Finally after these and a few other
chores were finished, I could take a moment
to hang the Wind Harp in the
sweet Banana Apple Tree!
I love to hear the magical
sound of it as the fingers of the breeze
plays a fanciful tune as she passes by.
 

And it is an especially sweet melody, because the
chime was a gift from a sweet daughter
and brings fond memories of happy days shared with her!


Joining these fun blog parties ~


Tuesday, May 1, 2012

Reduce, Reuse, Recycle...


...upcycle, repurpose, reclaim ~
whatever term you use,
I am putting 'it' into practice
in my garden!

Recently, I planted out my cabbage,
cauliflower, and broccoli.
Upon inspection the following day,
I discovered many chewed leaves
and even had to replace a few that
had been completely devoured.
I have been saving my TP tubes
to use as collars for the plants
but was a little surprised that I needed
to do it as I planted!
Lesson learned!

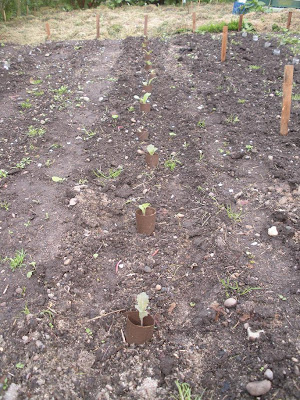
Collared brassica using
toilet paper tubes cut in half
and placed around the
plant, pushing it down into
the soil about 1/2 inch.

The collars will break down and become
compost right in the garden.

I am happy to report,
after several days with the collars
there are no more chewed plants.

[Do you know what might be chewing them?
I am thinking cabbage worms or
slugs!(WA State mascot!)
If the collars didn't work, I was going
to try a trick from my gardening friend
Clint at The Redeemed Gardener
who suggested using Epsom Salt ~
sprinkle a line around the plant or row.
As you know, slugs don't like salt
and won't cross it
and Epsom salt is good for the soil!
I am going to do with around my Hosta's ~
the slugs really love them!]


I also like to put the grass clippings between the
rows and plants to act as mulch as soon as possible
after planting to suppress the weeds!
It breaks down into compost right
in the garden. No need to handle it twice.
When the entire garden is covered, the
extra clippings go into the compost bin.
(I never use chemical fertilizers on my grass
so it is safe for the garden and compost.)


Half of the Spring garden mulched with grass clippings.

Here is a little rambling rose that I just
planted next to the greenhouse. It was a
wee start given to me by my daughter
a couple of years ago. It has been
in it's pot too long.
It is staked with reclaimed mahogany
wood slats
from Gentleman Farmer's work,
and some cheap trim molding
for the cross pieces. More molding will be
added as the plant grows up!
Just barely showing on the left
are recycled bricks at the
doorway to the greenhouse.
In the little bed against the chicken house,
(also made with recycled brick)
is another little rescued rose bush.
I can hardly wait to have the pretty little
pink roses climbing over the
Happy Hens Haus!

The planter boxes were made from
recycled lumber and trim molding
as well.

Now, to wash those chicken house windows
and I think I may make some little curtains,
from left over fabric, of course!


Joining these fun blog parties~


Monday, April 23, 2012

Weaving the pea trellis

Making your own pea trellis
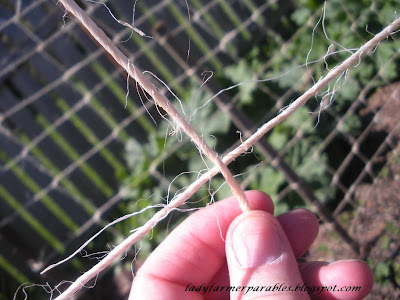
from baling twine is fun, cheap inexpensive,
and I like not having to purchase
plastic every year that is costly and
unpleasant,not to mention time consuming, to try
to remove the dead vines from.
It can be found at your farm store or garden supply store.

Here is what I did!


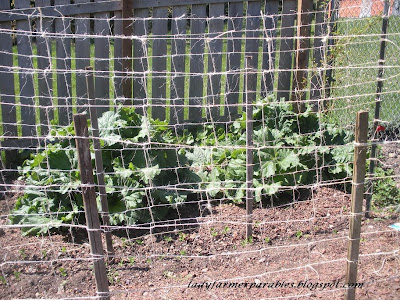
I used metal T posts for the ends of my pea rows,
pounded in before the peas were planted.
I planted my peas in a double row
to grow up either side of the trellis.

Starting at the bottom of one of the posts,
string lengths of twine between the posts and
tie off on opposite post.
Continue up the post, adding new rows
about every 4 inches apart.
I like to have some tall stakes pounded in
between the posts to support
and help prevent trellis from sagging. 


When all horizontal rows are completed,
tie the free end of twine to the top row
about 4 inches in
from the post. Measure to the ground and add
about six extra inches.
Bring twine down to the next row,
down over the front of the cross piece...


  under and up the back...


then over the top and down to the next row.


Continue down the rows of cross pieces
and tie to the bottom row.
Snip off any extra with scissors if desired.


Repeat every 4 inches across, starting at the top.


This makes a nice looking trellis for your peas
that can be composted along with your pea vines
at the end of the season.


Joining:
 Amy at Homestead Revival's
Barn Hop

Heidi at My Simple Country Living
for
Country Garden Showcase

Jami's Tuesday Garden Party
at An Oregon Cottage

Deborah Jean's
Farmgirl Friday #55
Tuesday, April 17, 2012

Planting...

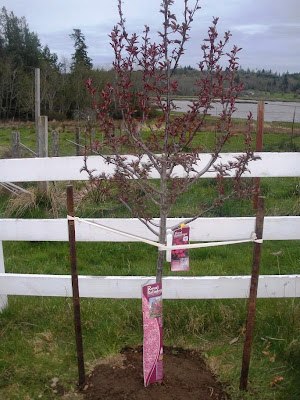
...six new Royal Raindrops
Flowering Crabapple trees
(very appropriate name for here in the PNW!)
A birthday gift from my Gentleman Farmer

to replace the six that the naughty deer
decimated!


Not so pretty, but protection for
a few years. Allowing the deer
to devour the trees was
a costly mistake that will not
be repeated this time!

~*~

Do you remember the Avocado pit that I started
a couple of months ago?
Well, it is ready to be potted up.


Washing the pots


Introducing the Avocado to the pots!


Filling the pot with soil


Planting the pit
(I think I remember that part of the pit is to remain above the soil level)


Ready to be placed in a bright window.


These were my planting adventures for the week!
~*~


Joining Jami for

Saturday, March 31, 2012

I'm in the Greenhouse...

Preparing for the gardening season ahead.
Preparing for the harvesting season ahead.
Preparing for the preserving season ahead.
I always feel like I'm on 'pins and needles'
when I wait to see what little seedlings
will pop up in the greenhouse each spring!
Our Spring has been cool and wet,
very cool and wet even for the PNW!
I have been having a hard time getting
some of the seeds to sprout, even in the
greenhouse with a heat lamp going
night and day!


I've huddled all the flats together on the side
nearest the heat lamp and even put a sheet of
styrofoam between them and the walls
for a bit of added protection from cold.

The cabbage and cauliflower are up and growing nicely.


The broccoli, too, is up even at the end of the
bench farthest from the heat. They don't seem
to mind a cooler environment.


I was very surprised to see pumpkins poking through
even before the tomatoes!


Three kinds of broccoli.
Not all of these starts are for me ~
I give many to my daughter and
several people at church.
(And this is only half of the seed! I do
have difficulty restraining myself from
planting the entire package, but I was
running out of pots. Lots were given away
last year with plants.)


I thought perhaps the tomatoes were not
getting enough warmth, so I stacked them
over some newly planted seeds, closer to
the heat lamp. And guess what?....


A few hours later the tomatoes had started poking
through the soil!
We may have tomatoes this year after all!
But I won't 'count my chickens before they're hatched'.
Last year I had 40 beautiful tomato plants,
but with our cool summer and fall
they yielded very little fruit.
I'm not easily discouraged.
Like the ant (Proverbs 6:6)
I am preparing for a bountiful crop
to put by for winter.

Joining:
 Amy for

Jami for